As a wielding expert, you will always chase the right and capable machine for your work, right? If so, then we have the best solution for you. What is that? Eastwood TIG 200 Review. This review will give a detailed real-time experience so that you can consider the feasible factors for your workstation.
Plus, we will show the advantages and disadvantages of our perspective since we will share our knowledge, positive and negative sides. It will become easier to understand product quality. Apart from defining all the essential information, we have designed an essential “How to” section.
This section will guide you “how to use the Eastwood welding tools“. So, let us take a glimpse at the Eastwood tig welder 200 amp ac/dc review and allow us to serve the best gist that you need.
Eastwood TIG 200 Digital ac/dc Welder Review
Welding is an essential purpose for your business. So, don’t let it down with random welders. Here is the complete review about the best welding machine, EASTWOOD TIG 200, just within your budget.
- This has been replaced with a new and improved model B09BK21C7Y
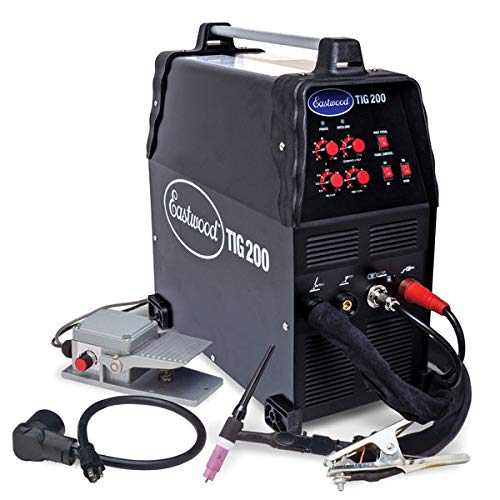
- TIG Welding AC Duty Cycle (%): 120VAC 60% At 145 Amps , 220VAC 60% At 190 Amps
- WP-17-Type Torch Accepts Common Cups And Collets With Up To 1/8" Electrodes
- Operates On Either 110VAC, 15-Amp Circuit Or 220VAC , 30-Amp Circuit - 1/4"-Thick Welding Capacity On 220VAC
- 3 Year Warranty plus 100% Customer Satisfaction Guarantee with free technical support
EASTWOOD TIG 200 is budget Friendly, even a popular TIG machine like the Diversion 180 by Miller costs you nearly $2000 bucks. It’s just a starter TIG machine, nothing fancy and yes, very pricey. Lots of people are jumping into the welding jobs in their garage. We ask a few of them, is it worth it? Huh, you got the right guess. They never think that would bet the better choice in any sense.
A huge thanks to EASTWOOD for sanding out their product to get us a complete idea about its capability.
After grinding with the EASTWOOD TIG 200 welder, we have come across a decision that this mighty welding machine is beyond expectations. Compared to all other TIG welding machines, we found this rich in features and of course, just in a price range that everyone can hook up with.
We would say that it definitely impressed us. Actually, it got a lot more features than you would find on the market for its price range.
The reasons we appreciate this welding machine are now we can weld thicker steel, stainless steel, and aluminum as well. So, we would be able to make intercooler piping, radiators, headers, manifolds, etc.
Yes, you can say that all of these can be done with a MIG welding machine. But as you know, MIGs can’t deliver 100% accuracy and perfection of welding result on stainless and aluminum, what it can.
So, undoubtedly, this EASTWOOD TIG 200 is going to be awesome to meet all of your starter and professional needs. In this article, we will discuss how it is going to be your best mate in all situations.
Eastwood TIG 200 vs Miller TIG Welder Diversion 180
|
Name |
Image |
Duty Cycle |
Voltage |
Weight |
Size |
Price |
|---|---|---|---|---|---|---|
|
60% at 190 amps |
120v/220v |
45 lbs. |
19.1″x 9.8” x 20.0” inches |
|||
|
35% @125 Amps |
120-240v |
65 lbs. |
26.5 x 13.5 x 21.5 inches |


Advantage Of Eastwood TIG 200
Let’s take a look into the major features that differentiate the EASTWOOD TIG 200 from the battleground.
Foot Pedal
For the best control, you will typically want to use its foot pedal to control the amperage, but there are cases where you want to use the trigger on the torch. Remember, the foot pedal allows you to control the amperage as you weld where the torch trigger is basically an on/off switch. But with this TIG, you do have more torch control.
Plus, you are getting a rocker style foot pedal and WP 17 flex head torch, as well as the ability to weld steel and aluminum up to a quarter of an inch. And don’t forget EASTWOOD TIG 200 comes with a significant three years of warranty and money-back guarantee.
2T & 4T Modes
When using the torch, you have two options – 2T and 4T modes. 2T stands for two touches, which is standard torch control. When you press the trigger, the machine goes to the amperage you have selected, and you are able to weld until you release the trigger. In this mode, you can also set the ramp-up time of the amperage. That means you can set the time it takes for the machine to get to the welding amperage. So, you can’t make it all at once, which helps prevent blow through and thin metal.
And for 4T mode, there are four touches. Press the trigger, and the machine will start an arc at your predetermined start amperage, and it will remain there until you free the trigger. Then the machine will slope up to the set working amperage and remain there while you weld until you press the trigger again. The advantage of 4T is that you can preheat the material with a starting amperage then ramp up to your working amperage.
Pulse Settings
The welding machine has pulse settings also, which is a feature that really makes this unit stand out. The digital TIG has both AC and DC pulse settings. Remember, DC is for wielding steel, and AC is for welding aluminum. This feature allows you to control the arc by fluctuating amperage up and down. It’s an excellent option for precision work like roll cages. Nonetheless, it’s pretty easy to understand and control.
Through the lens, you can actually see pulse features in action as the metal is welded, giving you that look on stacked dimes everyone wants.
AC/DC
In AC mode, you also have the ability to set the AC frequency and AC balance. Basically, this is going to allow you to control the arc shape, penetration, and cleaning when welding aluminum.
This digital TIG also has a mixed pulse. In many cases, while welding aluminum with low amperages that are to be challenging to stabilize. So, this machine has a DC pulse while fusing to do just that, stabilize your arc.
SpotWeld Timer
We found the spot weld timer as extraordinary stuff for spot welds, plug welds, or for running shortbread and can be programmed from 0 to 5 seconds. After selecting the spot weld timer, set the pre-flow and the post-flow like usual. Then program the amount of time you want to weld and set the amperage. So, you will be ready to start spot welding, making the same quality welds every time.
Programmable Welder Settings
Finally, there is another impressive feature, the programmable welder settings option. This welder machine also comes with the ability to program up to 15 settings to make the welding setup quicker and more comfortable. It even comes with five settings pre-programmed for many standard materials, which is excellent to get you started.
To add a preset, simply program the settings for the material you are welding and select loading. The next time you are welding that material, just select the preset with a push of the knob. The process is super quick and straightforward.
- Every function of an expert tool but at an affordable price
- This machine operates on 240 volts and
- Has a 10 to 200 amp welding range
- It’s great for welding steel and aluminum, thin sheet metal
- The high-frequency start will give you precise arc control
- The square wave inverter will provide accurate aluminum welding
- The WP-17 type torch allows getting the torch at the precise angle you need
- EASTWOOD three-year warranty and lifetime satisfaction guarantee
[rehub_affbtn btn_text=”Love Eastwood Tig 200? Get It From Amazon” btn_url=”https://amzn.to/3acTrD0″]
Disadvantage Of Eastwood TIG 200
The manufacturer has tried to mainly compete with the MIG welder rather than other TIG welders. And yes, in most, they have done an excellent job. But as you know, the MIG welders can work faster on thicker metal than TIG welders. So, that is the only universal truth you have to accept with the EASTWOOD TIG 200. Nothing more, nothing less.
- Can’t provide you support for MIG welding
- Buying from an unauthorized seller would be risky to get the warranty support
How To Use Eastwood TIG 200
Lots of cheers for your newly bought EASTWOOD TIG 200. You will be amazed to know how smoothly the unit can work to provide you a professional quality tic GTAW welding experience on both aluminum and other materials. Now, let’s check out how Does Eastwood TIG 200 Work.
Step: 1
To start with the welding process, first, you would need to connect the pedal to the far pin black plastic port. Also, it would require the connection of the dual-pin metal connector, which is placed in the front section of the machine. Then connect the hose. At the time of joining, avoid over tightening the brass fitting.
You would see the gauge on the left side that will read the shielding gas output. And on the other hand, the right-sided gauge reads its tank stress.
Step: 2
Afterward, the process needs to identify the correct tungsten. Using the setting reference would help you with that. Make sure to pick the correct one according to the material you are going to wield. The primary settings are divided into two- one is Pure Tungsten, which is marked green and used for aluminum. The other one is Fourier ‘td that is marked in red and used for steel welding purposes.
It is recommended to sharpen the tungsten in advance so that the arc would be able to be more fixated on the workpiece you are dealing with. You can use a dedicated grinding machine wheel to reach that goal. While sharpening, hold it in a parallel direction to bring a better result.
Step: 3
In the next step, remove the back cap and glide the collet out. The electrode diameter requires matching the collet size you have in your hand. Then you should insert a particular tungsten hooked on the collet and then just place it back into the torch. Don’t forget to lock the tungsten by reinstalling the cap. Remember another thing that your tungsten should create 1/8 inch to quarter inch outside the torch core.
To cup tie perfectly with the electrode diameter, you may need to replace the collet body. Make this job done by taking out the cup and then exposing the collet body. The brass body you are looking at is squeezed through in. Just eject it and change it with the accurate size like the tungsten you are using.
Step: 4
After that, you would need to switch on AC/DC buttons, which are located in the front of the machine. Hover on the reference chart, the machine came up with and arranged amp control according to the instruction. You would see the amps that have been registered as a range. It is because, depending on two factors, the digit of amps would differ. These stands, the kind of joint you are going to wield and the technique you are going to adapt.
At the time of arcing, set amperage on the facade panel so that you can optimize that according to needs every time. The reason is the button on the torch unfortunately does not come with a variable similar to the pedal ease. So, you would need to dial in to get the exact amperage after each test.
For the controlling purpose of the amperage, there is a side knob in the pedal. To switch the control to the pedal, use the front switch on the front panel.
Step: 5
Then you would have to select the tungsten type, size as the material you are using. After choosing the right one, just install that into the Eastwood TIG 200 torch.
You will find another knob to control the pre-gas situation. The pre-gas controller helps you to determine the amount of gas runs beforehand the arc begins. Retake a look on the settings chart to decide the value of the knob you need. Just at the right of the pre-gas control knob, you would find another knob that can be used to determine the post-gas movements.
Now to forward with the action, you would need to put on a metal helmet. It’s noticeable unless you want to be bold. And also put on high-quality gloves specially designed for welding purposes. So, now your head and hands both are safe UV emissions and heat burns. We would recommend using a flameproof welding jacket as well.
Finish Line
Now, let’s begin with the next step. Once you are done with forming the puddle, add a filler wire and move it forward for creating the weld bead. Then finish the bead by adding a final bead of filler wire and consistently slow down the pedal by backing off. Make sure to avoid a hole in the weld. When you are done with seizing the arc, let the tungsten become cold.
Eastwood TIG 200 Digital Aluminum Settings
You can get out of the EASTWOOD TIG 200 if you set up the settings correctly while working on aluminum. So, make sure to put in the right settings. You can follow the below instructions to optimize the TIG 200 for aluminum.
Step 1: Pre-flow Settings
Before starting welding, crank up the pre-flow settings a little higher than you would for steel. Switch it to 2.4 seconds.
Step 2: Post-flow Settings
Then you have to change the post-flow. Make sure to change it to about 4 seconds. It is more acceptable to have contaminants get into weld after you are done with the welding.
Step 3: Clearance Effect
Then the one you have to play with is the Clearance Effect or AC balance control on some other machines. Remember, the more negative you are going, the more arc you are going to get. So, you are going to have more penetration, but it will have less cleaning effects.
And if you go more towards the positive side, it is going to give you a bigger cleaning area and also have more shallow welds. So, change it depending on the metal age, and the cleanliness. We recommend you not to go down negative 1. To get the better result, keep it between negative 2 to 3.
Final Step
Turn on the foot pedal, have the AC side turned on, and of course, switch on to the TIG. Besides, for welding gas, make it 100% argon. So, that is all about the setup of the EASTWOOD TIG 200 digital aluminum settings.
Eastwood TIG 200 Customer reviews
So before making final decision lets check some real reviews of Eastwood TIG 200
It worked fast and I could easily control the heat. I just saved a good amount of time after buying these tools.-Stella
First of all, I loved the diagram. because it helped me to set up the tool. plus i did my first 30 works smoothly. Still going on, let’s hope for the future.-Wali
When i applied this on my 4 ft cast iron, it served me an amazing support. thumbs up.-Christopher
Obviously, I loved the foot pedal and finger switch. it in fact easier my tough right off the bat. cheers!-Vinchi
[rehub_affbtn btn_text=”Love Eastwood Tig 200? Get It From Amazon” btn_url=”https://amzn.to/3acTrD0″]
FAQ Of Eastwood TIG 200
Let’s move on to the most popular questions people are asking everywhere.
[sc_fs_multi_faq headline-0=”h3″ question-0=”Who Makes The Eastwood TIG 200 Welder” answer-0=”It’s actually EASTWOOD itself is making its products. And underestimate them because they have been helping DIY guys for restoring, customize their vehicles since 1978. They have over 4,000 products that help you do the job right like their full line of welders, paint, high-performance radiators, and more. Plus, they have an expert panel for their customers when they need to know something. Amazingly, they provide three years of warranty on each of their products, including welders. So, you can trust the EASTWOOD name for all your automobile projects.” image-0=”” headline-1=”h3″ question-1=”Can you use it as a MIG welder?” answer-1=”Unfortunately, you can’t. EASTWOOD made it only for TIG welding purposes.” image-1=”” headline-2=”h3″ question-2=”Does EASTWOOD provide a 3-year warranty with all of their products?” answer-2=”Yes, they do. Besides, some like the EASTWOOD TIG 200, you will get a lifetime satisfaction guarantee as well.” image-2=”” headline-3=”h3″ question-3=”How many torch modesdo EASTWOOD TIG 200 has?” answer-3=”It consists of two torch modes. The first one is 2T, and the other one is 4T. 2T stands for two touches, which is standard torch control, and for 4T, you will get four touches.” image-3=”” headline-4=”h3″ question-4=”Does the EASTWOOD TIG 200 have a DC pulse?” answer-4=”Yes, it does have DC pulse settings. The system helps you to stabilize your arc while welding with low amperages.” image-4=”” headline-5=”h3″ question-5=”Is TIG better than MIG?” answer-5=”Each of these has its own persona. MIG is quite popular nowadays because of its easily adaptive nature. On the other hand, TIG is traditional but provides more accuracy in welding results.” image-5=”” count=”6″ html=”true” css_]
Conclusion of Eastwood TIG 200 Digital Review
As you can see, the EASTWOOD TIG 200 has all the features you not only want but need to result in a quality welding output. All in all, the unit comes at a very affordable price range. So, when it’s about your welding business, no need to invest more on unless you are missing this superior TIG machine.
In this Eastwood tig 200 welder review, we have tried to disclose all the possible information that you would need to deal with. If still we have missed anything or you want to know more about the machine, hit us in the comment section. Till then, keep welding with the EASTWOOD TIG 200.
You may be interested in our best TIG welders under 1000 dollars. Read it here
